[divider height=”30″ style=”default” line=”default” themecolor=”1″]THE LESSON
If I’m going to be honest, teaching sentence types is not on my list of fav English topics; so when the topic appeared on the syllabus of my new class, instead of dreading the teaching process, I decided to go for an in-class flip (see this post for more information on what this is). Before I get into what I did, let me contextualize. I’m currently teaching an English speaking class to university students in which types of sentences is temporarily on the list of topics to teach. For this lesson I’m about to describe, I had previously flipped the explanation of what simple, compound and complex sentences were. Students had been asked to watch two youtube videos and to take notes of their doubts.
However, no class is ever perfect. So, of course, there were students who did not do the task, and I needed to continue with the process in order to focus on the struggling students. Thereby, an in-class flip configuration became ideal here: it would let me keep an eye on the strugglers, let those who knew the topic practice and continue with their learning, and it would also solve the “I didn’t do the homework” situation of some students. Let me tell you how I did it.
[divider height=”30″ style=”default” line=”default” themecolor=”1″]THE PLANNING PHASE
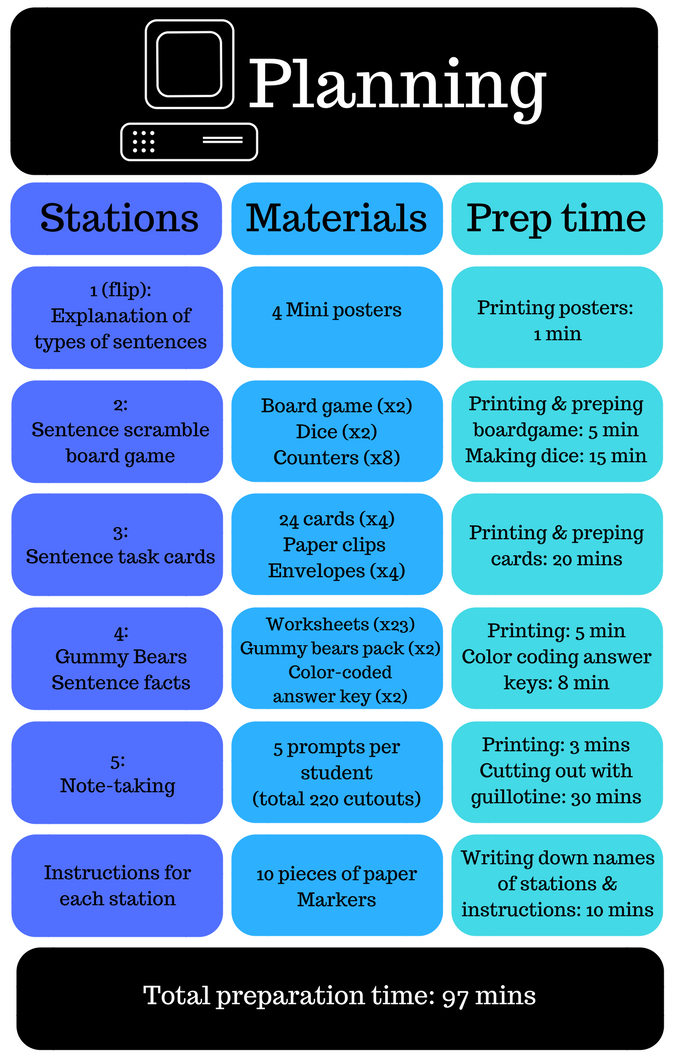 Anyone who has in-class flipped a lesson will tell you that the planning can be a little time-consuming depending on how many stations are planned and the types of activities. This will also depend on whether or not you already have the material you need stored somewhere. However, they will also tell you it was worth it. In the end, planning a good class will always take time… it comes with the calling of being a teacher. An estimate of this in-class flip added up to 97 minutes for preparing the material. This lesson was carried out with two groups of an average of 22 students each in a lesson of 80 minutes.
For this lesson I decided to create five stations ( 1 flip and 4 practice stations) with what my colleague @crbuitrago and I have called a looped configuration. This means that the lesson was planned for students to go through all the practice stations regardless of where they had started. The flip station was optional for students who really needed it. This also meant that the activities that I was going to plan needed to have a level of difficulty that all students were capable of doing. To my luck, I found great resources in teacherspayteachers.com and had no need to create any extra material on my own
[divider height=”30″ style=”default” line=”default” themecolor=”1″]IMPLEMENTING THE IN-CLASS FLIP
For the set up, I arrived 10 minutes before class. Luckily, a colleague who had just finished class in the same classroom offered to help put up instructions on the walls next to each station. Also, as students came into the classroom, they were asked to help arrange the seats, which they kindly did. All in all, the set up took about 10 minutes.
When everything was ready, I gave my students a walk through of each station so that they could visualize the activities they would be working on and understand the interaction and purpose. I only mentioned what each station contained without emphasizing on instructions. I mean, the whole point of thinking thoroughly on how to write each instruction was to avoid having to go over them (some valuable minutes saved here). Moreover, I explained that maximum 8 students could work in each station; I chose this number so that there would always be space for students to move among stations. I also clarified that station 1 (flip station) was available for whoever required a brush up on the content explanation and was there for them to walk to whenever they were in doubt.
This was the set-up:

I’d also like to share the following video of the set-up of this lesson, which was part of an in-class flip workshop I gave last week for English teachers at the Centro Colombo Americano Symposium in Bogota, Colombia:
Check out some of the pictures I took in class, which also illustrate the set up:
Because I teach two classes of the same level, I tried this in-class flip with 2 groups the same day and made some adjustments. Below is the explanation of what I did in each one.
The in-class flip with Group 1:
With the first group, in order to assign students to a station, I handed out a colored sticky note to each one: red (station 2), blue (station 3), green (station 4) and purple (station 5). Then, I directed them to their corresponding stations. I also started timing the station work and initially set the timer to 15 minutes. Station 2 and 3 took the 15 minutes. However, stations 4 and 5 took half the time, so when I noticed students had finished in both stations, I switched them. This meant that rotation in these stations would be faster, and the switch was an easy solution to the timing situation. After that, I played it by ear and directed students to stations as they finished instead of timing the rest of the stations. I had initially thought students would take the whole class to finish the stations, but about 10 minutes before time was up, students had finished, so that gave me enough time to ask them to provide feedback about the activity with post-it notes. I handed each student a post-it note and asked them to tell me what they though about the activity.
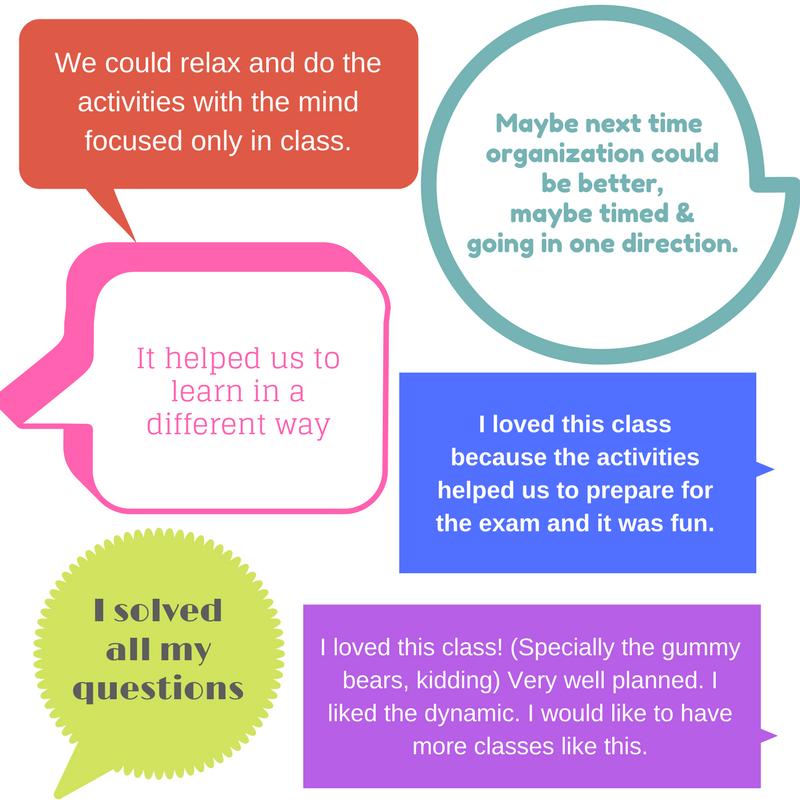
This is what my students had to say:

These were the key words they used to describe the in-class flip.

The in-class flip with group 2:
The second time around I did not time the stations. This time, as students entered the classroom, since the stations were already set, they took the liberty to sit in the stations of their choice, so I went along with it and let them start where they had chosen to sit. I also rearranged some students to make sure the stations had the minimum students required for each station. In this group, I had a case where instead of four playing the board game, there were five. Also, in one of the pair work activity, three ended up doing the task. This was due to an uneven number of students, which was not the case of group 1, but also to students finishing faster and wanting to move forward. This meant being flexible with number of students allowed for an activity, which in the end worked just fine as well. With this group, instead of directing students to the stations as they finished, I decided to let them move around freely as long as they kept in mind the rule of “maximun 8 students per station”. Students knew that by the end of the class, they had to complete the 4 practice statiosn. In the end, students also finished the rotation before the class ended. Only the next day did I notice 2 students had not passed through station two, saying they did not have time. In this respect, I believe this was a consequence of giving them the choice to move around at their pace and not asking students individually if they had completed all the stations as I did with the first group. Point taken.
Here is what this group had to say:
And these are the words they used to describe the lesson:
All in all, both groups shared an overall positive opinion about the in-class flip. Yay! Nevetheless, in the first group, one student seemed to find the activity boring, so I followed up and asked him why. Turns out it had to do more with the topic and the people he ended up working with (who he didn’t get along with) than the actual in-class flip dynamic. In the second group, it is evident that the free rotation I adopted was considered unorganized by one of the students, who suggested timing and a one way rotation.
[divider height=”30″ style=”default” line=”default” themecolor=”1″]WHAT I NOTICED DURING BOTH IN-CLASS FLIPS
- About 20% of students in each class went to station 1 to go over the explanation, including some students who had seen the explanation at home. The rest did the work with their understanding of the topic.
- I had enough time to walk around and clarify doubts of those who were really struggling while the rest were focused on the task.
- As students advanced from one station to another, their speed in finishing the activities increased. For instance, students who started playing the boardgame took five minutes more than those who finished in this station. This makes sense, since they mastered the topic from one station to the next. In other words, as their understanding of the topic increased in each station, so did their ease to accomplish the tasks.
- I had no need to explain any of the instructions. Point for me on instruction writing!
[divider height=”30″ style=”default” line=”default” themecolor=”1″]TO KEEP IN MIND
- Seize the chaos! The dynamic changes. Allowing students to work at their own pace and giving them the chance to choose inevitably brings some ‘chaos’ into the classroom. Welcome it. Here chaos is a good thing.
- Play it by ear. Estimating time to stations is tricky the first time you try out an activity. However, the second time, you know more or less how much students take and whether an adjustment is required in order to synchronize time per activity per station.
- Setting up stations requires time. If you have no way of arriving earlier to your classroom, ask your students to help out with the set up. There will always be students to help out.
- Make reusable class material. Because planning stations takes time, make sure you create material you could reuse (as much as the activity allows).
- Organize the material you plan for later use. Whether you create material by hand or in a digital format, make sure to save it in a folder you can easily access in the future. If the in-class flip turns out to be awesome, there wll be no doubt your next group of students will enjoy it as well.
- Always ask for feedback. Using exit slips is a great way to have quick and personalized feedback on the activity, which will continue informing your teaching for continuous improvement.
[divider height=”30″ style=”default” line=”default” themecolor=”1″]RESOURCES
Want to give it a try? Here are the resources I used in this lesson for you to download them and use them!
Station 1: Types of sentences mini posters
Station 2: Sentence scramble board game
Station 3: Sentence task cards
Station 4: Gummy Bear Facts
Station 5: Notetaking prompts
Your comments are welcome below!
I am one of the colleagues who benefited from Martha’s generous sharing ideas. I saw Martha’s class happen and how engaged her students were. My students also gave me very positive feedback and enjoyed the lesson while being engaged in learning. No doubt I am continuing working with flipped classes in the future.
Thanks so much for all your help, Luisa!
Excellent description of the lesson Martha! The photos and video were necessary to finally understand the whole process of the lesson. Your reflection on how the lessons went was so useful as well, they answered many of the questions that came to my mind.
Great job! Thank you!
Thanks for your comment Nuria! It’s great to know your questions were answered! 🙂
I’m citing you! I so love what you have done here!
Thanks so much Astrid!
Thank you for this idea! This is the first time I’ve heard of class flips. I am sure this will also be appreciated by the learners.
Thanks for reading! Glad you found it useful!